Tuesday, May 31, 2016

Shoppes Try-fold cards

 I have a couple of Art Impressions cards to share today!  This is the first time that I've coloured up the Shoppes TF Set (Sku #4339):
 After untying the ribbon, here is what the try-fold looks like:
 And here is the inside, with both side flaps open.  I backed the two side pieces with some patterned paper to hide where the Copic markers bled through.  The set includes all three images, plus the sentiment:
 All of the images that come in the set can be used individually on regular cards, so here is one using the main image:
There are quite a few Try-fold sets available in the Art Impressions store - you can find them all here!
Copics used: Greens - G46, G43, G40
Yellows - Y26, Y23, Y21, E50
Reds - R27, R24, R22, R20
Blues - B26, B24, B23, B21, B0000, B000
Browns - E47, E44, E43, E41
Greys - C7, C5, C3, C1, C00


Sunday, May 29, 2016

Freshly Made Sketches & Inspired By

I made a card for two challenges this morning... I am using sketch #238 at Freshly Made Sketches, and am playing along with this week's Inspired By All the Little Things lovely teacup photo that Tracey McNeely chose:
I used one die and three Verve stamp sets, and decided to move the sentiment to the top corner to balance things off a little.  I popped up the entire white panel as well.  Here was our inspiration photo:

And the sketch:
Patterned papers are Bundle of Joy by Echo Park, and Wings by Close To My Heart; Stamp sets are Better Together, Sweet Treats and Coffee by Verve; Leafy Sprigs dies by Verve; Inks are Orchid Bouquet by Close To My Heart; Rich Cocoa by Memento & Onyx Black by Versafine;  Licorice Opaque Pearls by Close To My Heart; Flowers from my stash.

Thursday, May 26, 2016

Brand new Mini TryFolds from Art Impressions!

Art Impressions is launching two brand new Mini Try-fold sets today, and I am sharing a step by step tutorial here and on the Ai blog.  Warning, photo alert!!  I wanted to show you exactly how the set works, so bear with me!  Here's my card:

I'm so excited to share the new Ai Mini Try-folds with you today!  These make the absolute prettiest cards that you can imagine.  I have all kinds of photos to share, with step by step instructions, so grab your coffee, and scroll down a ways to see how easy these are to create.
 I am using Blessings To You MTF (Sku# 4758).  The set includes 3 images, a sentiment, and two small dies, along with complete instructions for cutting and stamping on the back of the package.
 My cardstock is 4 1/2"x11" and is scored into thirds.  I stamped the largest image, centered on the right panel, and then placed the larger die over the opening in the middle of the image.
 After running it through my Cuttlebug, I folded the card sides in, and traced lightly around the opening with a pencil, onto the cardstock flap underneath.  This allows me to see where the next image should be stamped.
 With the top flap open, here you can faintly see where I'd traced through the opening, and now have stamped the second image over the pencil lines.  Then I will fit the smaller die into the center of this image, and run it through my machine.
 Once more, I will trace around the opening through to the bottom panel, which is the inside of the card.
Look closely!  You'll see the faint pencil outline which shows me where to position the small bunny image.  I put both the bunny and the sentiment onto the same acrylic block and stamped them over the pencil shape.
 So after stamping the bunny - this is what the card looks like with all of the panels folded.  The positioning of the images does not have to be exact - the idea is that you want to see a glimpse of all three layers when the card is folded shut.  Here are the layers coloured with Copic markers:


 In addition to the two Mini TF sets, we are also launching two new Clasp dies designed especially for the Mini TF's.  I'm showing Butterfly Clasp Die (Sku #4748):
I secured the die onto my cardstock with some washi tape, so that it would stay in place.  I only have the shorter base plate for my die cut machine, so I ran it through once, then turned the die around and ran the other end of it through - the tape kept the die from moving around.
All of the Ai dies cut beautifully.  The clasp simply wraps around the Mini TF, and there is a small slit on each butterfly that allows them to interlock, forming a belly band to keep the Try-fold closed.  I used my purple Copics to tint the edges of my butterfly, and then coated him with some Wink of Stella so that he shimmers.  Thanks for hanging in there through all of my photos!  Enjoy!
Copics used: BV04, BV02, BV01, BV00, BV000, YG05, YG03, YG01, YG00, G46, G43, G40, R35, R32, R30, C3, C1, C00, B000, B0000, Y35, Y32, Y11.

Wednesday, May 25, 2016

The Challenge #74

When I saw this week's inspiration photo at The Challenge... it was too good to be true.  I just happened to have this fun guy image stamped and sitting on my craft desk.  So I quickly coloured him up, and put together a card.  I was tempted to do the tractor red like the photo, but all ride'em mowers are green, aren't they??  I added a few red accents, though:

Patterned papers are Souvenir Collection by Bo Bunny; Cardstock is Cranberry, Outdoor Denim & White Daisy all CTMH; Stamps are Lawn Ranger & FDMD set by Art Impressions; Inks are Tuxedo Black, Memento & Onyx Black by Versafine; Maya Road twine; Cloud Dies, Taylored Expressions; Copic Markers.

Tuesday, May 24, 2016

Comfy on Couch - Girlfriends

Hello Ai fans!
There's nothing like colouring up one of the Ai Girlfriends images :o)  I selected some bright girly coloured papers that would work well with them all being in their jammies, and then set about colouring the image to match.  Here is 
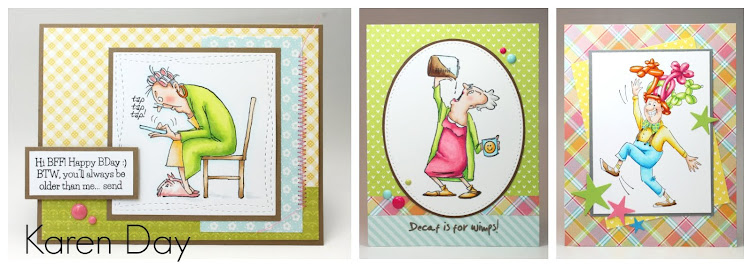
Comfy on Couch Set (Sku #4050):
 I had an oops happen when I was almost finished colouring the entire image.  If you look at the gal on the left, where her hip meets the sofa... I was using that darkest plum shade, when it suddenly dropped a huge bubble of ink on my paper!  If you look closely you can still see traces of purple on the sofa, but by and large I was able to chase most of it back onto her top with my colourless blender.  Whew.
 I popped up the sentiment and the eyeglasses, and added a few gumdrops to finish things off.
 Copics used: Skin tones - E37, E34, E31, E11, E00, E000, E51, E50
Hair - E18, E07, E02, E57, E55, E53, Y26, Y23, Y50, C7, C5, C3, B21
Greens - G46, G43, G40
Blues - B28, B26, B24, B23, B21, B37, B34, B32
Greys - C5, C3, C1, C00
Pinks - R89, R85, R83, R81, E22, E20
Oranges - YR04, YR02, YR00
Yellows - Y26, Y23, Y21, E50


LinkWithin

Related Posts with Thumbnails